How to Fix DJI Mavic Drifting While Hovering
It is not uncommon to see a drone having a vertical or a horizontal movement without any input, and it is called drifting.
This can happen due to a multitude of reasons and it is pretty normal, however, the drifting can intensify sometimes and that can be frustrating.
Not only frustrating but it can also be dangerous if the sensors are not working properly as the drone might crash when operating in tight spaces.
So, Why is your mavic drifting and How to Fix it?
If your DJI Mavic has a horizontal or vertical drift while hovering check if there are no physical obstructions, make sure there are 10 satellites or more connected, perform a compass and imu calibration, calibrate your controllers and finally try cleaning the downward vision sensors.
There are however several factors like loose or damaged propellers, harsh winds, and such can also cause this issue.
How to fix this issue and make your drone stable when hovering
There is no one certain way to fix this issue, so I will give you a checklist which you should try one by one till the issue is fixed
1. Recalibrate the compass
Proper calibration and recalibration, when needed, is crucial for a safe flight and a stable controller, and this goes both for the aircraft and the remote controller.
A poorly calibrated drone will not take off properly, drifts in the sky, and might even lose signal.
So we are going to start off by calibrating the compass. calibrating the compass is a straightforward process and you most certainly have done it before when you first bought the drone.
- Turn on your drone
- Launch the software you use whether it is DJI go or DJI fly
- Go to the menu in the top right corner of the app
- Go to Advanced Settings at the bottom.
- Then go to Sensor State.
- Select “Compass” in the top middle.
- And tap “Calibrate Compass”.
- Then follow the onscreen instructions.
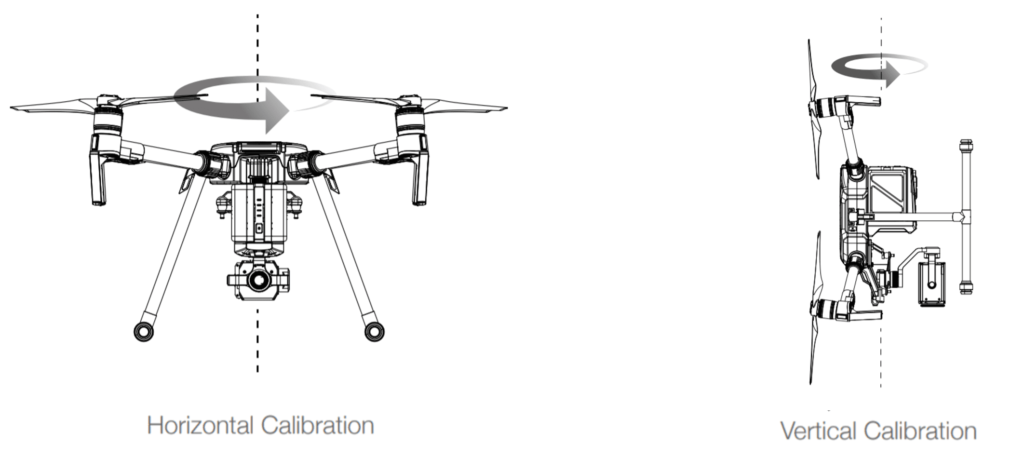
2. Calibrate IMU
After performing the compass calibration do a follow-up with IMU calibration.

- First Go to an open area outside, away from metal structures and buildings.
- Launch the software you use whether it is DJI go or DJI fly
- Tap on the 3 dots in the top right corner.
- Tap on “Safety” then tap sensors under safety
- Scroll down to the “Sensors” section.
- Select “Calibrate” to the right of the Compass.
- Click on “Start”.
- The status indicators lights will blink yellow indicating that the calibration is about to start.
- Then follow the onscreen instructions.
- When the indicator light changes from flashing yellow to solid green move on to the next direction.
- When both horizontal and vertical compass calibration is completed successfully, the indicator light will start flashing green.
After completing IMU and compass calibration set your drone to the test and see if it still drifts, if it does keep on reading.
3. Weight imbalance
For a stable drone flight, the center of mass is essential.
If you have 3rd party accessories on your drones it is common to have a weight imbalance between the right and the left side, or the front and the backside of the drone.
To counter the imbalance you can either remove what is causing it or you can do a recalibration while the accessory is still on the drone which tells the motors to readjust to the weight
If the drone is balanced, then the imbalance of weight is not the issue, and if you find any imbalance, you inspect. This includes checking propellers’ position, finding any damages on motors, checking battery weight, etc.
4. Recalibrate the controller sticks
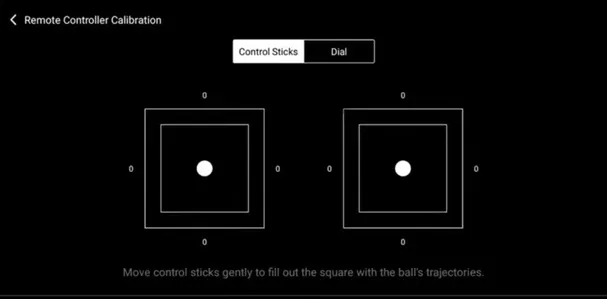
If there is a bit offset on the controller sticks that can cause drift on the drone which is to be expected, if this is the issue it is a very easy fix it just needs a calibration-
- Then turn on the remote controller and launch the DJI go or DJI fly app
- Press the remote controller icon and choose RC calibration.
- Tap calibrate, make sure both control sticks are centered and tap the start button.
- you can be promted of a warning message, press ok.
- Rotate the control sticks in every possible direction according to the direction shown in the app.
- Ensure each stick has gone through its entire range of motion.
- Then rotate the dial and fill the progress bar in each direction as shown in the app. Tap finish.
- Remote controller calibration is now complete.
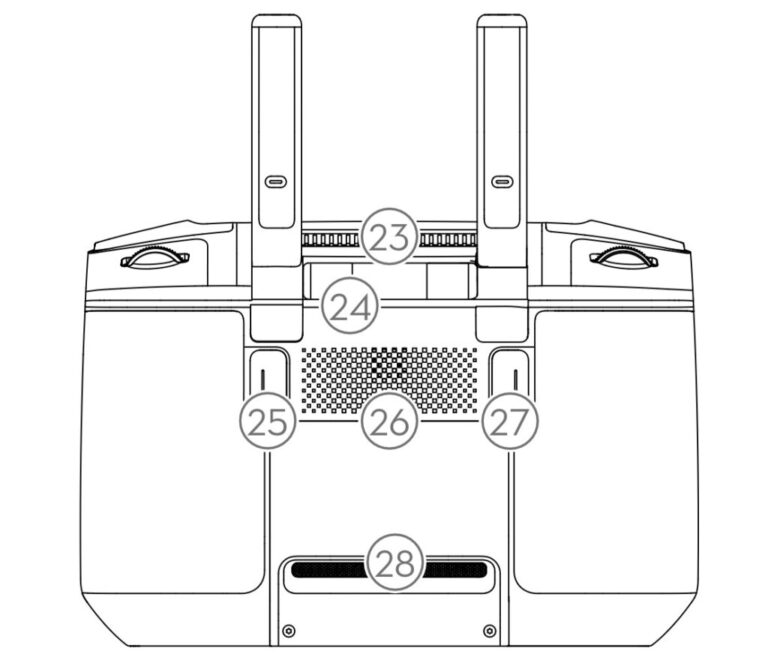
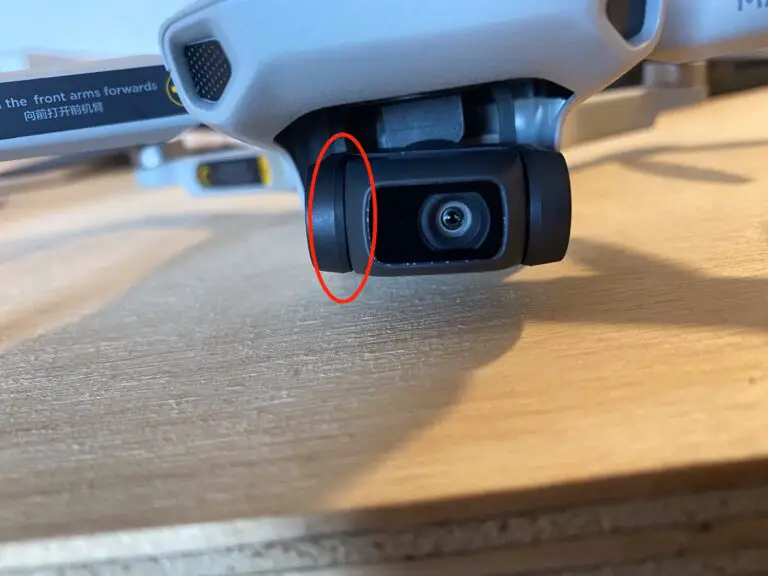
5. obstruction on the aircraft
If you had a hard landing or had a bump with an object there is a chance you might have a damaged part.
The damaged part can be internal like wires or external parts like the propeller, or one of the vision sensors can be out of place which makes it hard for the drone to stabilize in a place.
6. Refresh firmware in DJI assistant 2
You can also start with a clean plate by refreshing the firmware of your drone
- Power on the drone
- Connect it to your computer using the USB cable DJI provides
- Open the DJI Assistant 2 software on your laptop
- Log in to the DJI Assistant 2 app and select your drone
- Next, you will see the firmware version
- Tap update and choose the latest version
- If it is already the latest version click refresh
- Repeat process with other batteries(if you own one)
7. Update/refresh Controller Firmware
After refreshing the drone’s firmware you should do the same for the controller to match them
- Power on the remote controller
- Connect it to your computer using a USB cable provided
- Open and log into the DJI Assistant 2 software on your laptop
- Select your drone’s remote controller
- Next, you will see the firmware version
- Tap update if you have an older version or tap refresh if it is up to date
- Click on “Start Update”
- On the next screen, you will see the firmware being downloaded, then transmitted and updating the remote controller
- At 100%, you will see the message, “Update Complete”
- After the firmware is complete, the controller will restart automatically
8. Factory reset your drone
If nothing seems to work you before sending it to a professional you can try a factory reset, this won’t do much if you have already refreshed the firmware however it won’t hurt to try.
- First, Install the DJI Assistant 2 Program on your device, make sure you download the proper one.
- Connect your drone to your laptop using the USB cable provided, and wait for the software till it to detect your drone
- You’ll be able to see your drone on the Connected Devices screen. Select your drone and then click on confirm.
- Click on Firmware Update. After that, you’ll be able to see the “Restore factory defaults” button.
- Click on the factory reset button and then confirm when you are asked to confirm the reset. A progress bar will pop up showing the progress of the reset. You’ll be notified when the reset is complete.